Singly Linked List with Javascript
Building a Singly Linked List with Javascript, and reverse it
When working with data in Javascript we usually rely on arrays and objects as primary way to store data. There are in fact a lot of different way to structure our data and each one of them has some pros and cons and a practical usage. Linked List are a type of data structure that isn't talked too much and, especially when it comes to interview, seems to be a topic quite scaring.
I am not entering into the discussion of the algorithm/data structure interview for a FrontEnd (there is enough fire out there about it), but Linked List can be pretty useful compared to array, and they have a lot of advantages.
All the code is available on github.
What are linked list?
Linked list is a very simple type of data structure where each Node has a pointer to the next node.
A linked list is formed by 4 elements:
- Nodes, an object that contains the value and the pointer to the next element.
- Head The first Node of the list
- Tail, The last Node of the list. This object as a property next that is set to null
- Length (or Size) the lenght of the list.
How Linked List differ from Array
Linked List have no indexes. You cannot do MyLinkedList[1] to get your item (we will implement our own method for it), but this is a good think because it makes insertion and deletion very fast compared with Array, this is because we don't need to re-index the list.
Array are of a fixed size while Linked List are dynamic in size. If this is not clear look at this image.
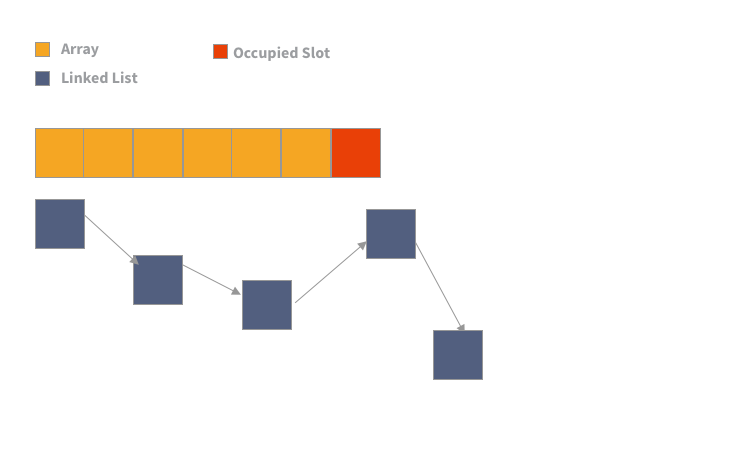
The orange slots are the one occupied by the array. Once we declare our array const arr = [1,2,3,4,5] a slot of memory is assigned to this data. You can see that the slots occupied by the array are contiguous. If you look at the blue one, taken by the linked list, we can see instead that is dynamic, because each node is going to take his own space, and we jut have pointers.
The red slots indicateds a slot that is already occupied, at this point if we add a new item to the array the entire array will have to be relocated in memory, while with a Linked List the next added node it will just take the next available slot.
It might seems confusing but in fact you don't need to know all this memory stuff, it's just good to know what is the main difference with Arrays. So to recap:
- Linked List are better for quick insertion and deletion. If you have to do this often, a linked list is much efficient than an array.
- Linked List are dynamic in size, array are fixed. This does not mean it is always an advantage because it also means that it is using more memory (is a little trade off, like with recursions).
- Arrays are better at random access
So when to use a Linked List?
If you do very often insertion and deletion of element, then go for a Linked List. If you need often random access go for an array If you need to traverse the data often, then again array is a better solution.
Practical Use for Linked List
If you think about it, a Linked List is basically a Node that points to another node (the next) but cannot go back (there are Doubly Linked List for this), it can grow dynamically and it has a start and a end (head and tail). This makes it perfect for example for a Learning Path or a Lesson Plan. Once you attended lecture one, then the next step might only lecture two, and so on.
Also, level of videogames can be seen as Linked List, you play on the first level once you finish that level you can only go to the next one.
These are some of the example that just came in my mind right now, I am sure that there are a lot more.
Let's build our own linked list
So I think it's about time to start coding something and build our own Linked List. Here some notes to consider:
Naming: Linked List, unlike arrays have no built-in methods, that means we have to build our own. For simplicity I will try to use the same naming as array. but this is not a rule. For example I like to call the method to remove the Tail (last element of the list) pop, like array. But you could call it removeTail. I prefer pop because in fact we do not remote the tail, the previous Node will be our new tail.
Coding Style: I am using ES6 classes, just to make the readability a bit easier. You can use function if you want, in the end this is what a ES6 class is so feel free to use whatever you want.
Comments: While learning these data structures commenting my code very often helped me to better remember what I did when I came back to it after some months :D Anyway, I am just warning you that I will add a lot of comment, hoping this will help to better understand what is going on.
First we build our Node and then our SinglyLinkedList Class:
/** Class representing a Node */

// We create the Node

class Node {
  constructor(val) {
    // Initialize the node with the val passed
    // And set the next pointer to null
    this.val = val;
    this.next = null;
  }
}

/* Singly List Class */

class SinglyLinkedList {
  constructor() {
    // Initialize with the basic 3 elements of the list
    // Head, Tail, Length.

    this.head = null;
    this.tail = null;
    this.length = 0;
  }
}

// Initialize List

const List = new SinglyLinkedList();
Is Empty Method
We will often need to check if our linked list is empty. We can use one of the 3 main elements of the list to verify if empty and return either true or false. Let's add this little helper then
	/**
   * Check if the list is empty
   * @return {Boolean}
   */

	isEmpty() {
	// If no head or length is 0
	// return null/false
    return !this.head || this.length === 0;
  }
Now we have a Node class and out SinglyLinkedList class, we can now add our first 2 methods. We can start with removing the head and the tail. For this we need 2 methods:
- Shift - Removes the first element, the head
- Pop - removes the element at the end of the list, the tail
Shift Method
Let's look first at the logic for removing the head. First we look at the edge cases:
- Is the list empty?
- Is the Head also the only node in the list? (if so it means is also the tail)
After considering these 2 cases we know now that the head exists and it has a next Node, which is going to be our new Head. So it's just a matter of setting head.next to be the new head.
  /**
   * Removes head and set next Node to be the new head
   * @return {Node} the removed Node
   */
  shift() {
    // Edge case 1: List is empty
    if(this.isEmpty()) return null;
    // Store a reference to the removed node
    const removedHead = this.head;
    // Set next to be the new head
    this.head = this.head.next;
    // decrease length
    this.length--;
    // Edge case 2: Head was the only node
    if(this.length === 0) {
      this.tail = null;
    }
    // Return the removed Head
    return removedHead;

  }
}
I hope the comments are clear. This is pretty easy, we just have to be careful with the edge cases.
Pop Method
Popping a node from the list, in this case the tail, is a little bit different than removing the head. In this case we need to traverse the list until we reach the end, the tail, we need a reference to the previous node wich will be our new tail. Always remember the edge cases. The steps are:
- Verify if list is empty
- If list has only one node, then tail and head are the same, we set them to null and we return the removed node
- If none of the above we loop through the list using a reference to the next pointer.
- If node.next is null we reached the end
- Now we have a reference to the node previous to the tail, we set the tail to be this node.
- Set tail.next to be null
- Decrease Length
- Return removed tail
// Check if list is empty
if (this.isEmpty()) return undefined;

// If there is only one Node
// Then we can just set head and tail to null
// And return the tail
if (this.length === 1) {
  const tail = this.tail;
  this.head = this.tail = null;
  this.length--;
  return tail;
}

// We must traverse the list
// Starting from the head
// So we get a reference to the list
let current = this.head;
// Because Singly Linked List cannot go backward
// We need a reference for what it will ne the new tail, the last node in our loop
let newTail = current;
// The tail has next null
// So the loop stops when we reach the tail
while (current.next) {
  // the newTail keeps following the current node in the loop
  newTail = current;
  // We move on to the next pointer
  current = current.next;
}

// We reached the end of the list
// newTail is now the last item
// So the tail
this.tail = newTail;
// Cut out the next Node
// So tail.next = null
this.tail.next = null;
// Decrease the length
this.length--;

// Return the node we just removed
return current;
Unshift Method
Now we want to add a new Node that will be the new head, so like in array we want to have a unshift method that adds his node to the beginning of the list. Here is where Linked List really shine and win easily. What we have to do is just to set the new node to be the head and the head to be the next of this node. Steps:
- Create a new node from the value passed
- Check if list is empty. If so, then head and tail are the new node
- If not empty set new node.next to the the head
- Set node to be the new head
- Increased Length
- Return the new list
Remember that all this methods works in place, we are mutating the list in place.
	/**
	 * Adds a new Node at the beginning of the list
	 * The new node is now the head
	 * @param val - the Node value
	 * @return {SinglyeLinkedList}
	 */

	unshift(val) {
		// create the node
		const node = new Node(val);
		// if list is empty set head and tail to be the new node
		if(this.isEmpty()) {
			this.head = this.tail = node;
		} else {
			// 3. Set node.next to be the head
			node.next = this.head;
			// 4. Set new head
			this.head = node;
		}

		// Increment the length
	    this.length++;
	    // Return the List
	    return this;
	}
Push Method
Now we want to add a new item to the end, the tail. This is also very easy and fast. Here the steps:
- Create a new Node
- Check if list is empty, set head and tail to be the same
- set actual tail.next to be the new node
- set the tail to be the new node
- increase length
- return list
	  /**
	   * Adds a new Node at the end of the list
	   * The new node is now the tail
	   * @param val - the Node value
	   * @return {SinglyLinkedList}
	   */

	   push(val) {
	   	// 1. Create a new node
	   	 const node = new Node(val);

	   	// 2. If the list is empty then
       // then the new node is both the head and the tail
    if (this.isEmpty()) {
      // set both head and tail to be the node
      this.head = this.tail = node;
    }
	   } else {
	   	// 3. Set the next pointer of the actual tail to be the new node
      this.tail.next = node;
      // 4. Then set the new Node to be the tail
      this.tail = node;
	   }

	   // 5. Increase length
	   this.length++;

	   // 6. Return List
	   return this;
	}
Ok, so now we have our basic methods. We now want to implement some helpful methods:
- A Method to empty the list
- Traverse the list
- Search for an element in the list based on its index or value
- Update a node
- Insert new nodes at a certain index
- Reverse the list
Empty the List
Let's start with the simple one. Empty the list
	/**
   	* Empties the list
   	* @retun {SinglyLinkedList}
  	*/

	  emptyList() {
	    this.head = this.tail = null;
	    this.length = 0;
	  }
Self explanatory I would say.
Traverse the List
Traversing the list is easy, we just go to the next node 'till we hit null. This method might come handy for some next other methods. We can add a callback to the method, so that we can then reuse the value or node to do something. I'll call this method run, I just like it more than traverse.
	 /**
   * Traverse the entire Linked List
   * @callback cb - do something with the list
   * @Example
      function log(node) {
        if(node) {
          console.log('The value is: ', node.val);
          if(!node.next) {
            console.log('we reached the end, ', node.val)
          }
        }
      }
   *
   * */
  run(cb) {
    // Reference to the head
    let current = this.head;

    // Loop until we reach the end
    while (current) {
      // Do something with the value
      cb(current);

      // move on
      current = current.next;
    }
  }
We can search in a Linked List either based on the index or the value. For the value is pretty easy to do. Just loop through all the list until you find the value you are looking for.
   /**
   * Find a Node in the list based on a value
   * @param val - the value to search in the list
   * @return the Node if found or false
   */
  find(val) {
    let current = this.head;
    // traverse the entire list
    // We could use also the run method and pass the
    // callback to it
    // But let's do it normally
    while (current) {
      if (current.val === val) {
        // we found the node
        return current;
      }
      current = current.next;
    }
    return false;
  }
Now it's time to add a search method for the list. I am saying here search, but probably findAt is a better name for the method. We pass the index and we return the node that we have found. As I explained before, we must loop through the list in order to find our node.
	/*
	* Search for a node in the list
	* @param {Number} index - the index of the node
	* @returns {Node} the node
	*/

	findAt(index) {
		// First we must be sure that the index is present in our list
		// We know that it cannot be negative and cannot be greater than the length of the list
		if(index < 0 || index > this.length) {
			return null;
		}
		// let's create a variable to keep the count in the loop
		let count = 0;
		// We keep a reference to for looping starting from the head
		// Until we find our node
		let currentNode = this.head;
		// Loop until count is equal to index
		while(count !== index) {
			currentNode = currentNode.next;
			count++;
		}

		// We found our node and we return it
		return currentNode;
	}
It's time now to update a value. This is now really easy, we just created a fintAt method that we can reuse here to get the element, using the index, and then we just need to update the value val. The only check we have to do is to see if he value exists or not:
	/*
	* Update a node in the list
	* @param val - the new value for the node
	* @param {Number} index - the index of the node
	* @returns {Node} the node
	*/

	// Set the value on a certain index
	// I use set as name rather than update
      update(index, val) {
      // we take advantage of our findAt method
      let node = this.findAt(index);
      // If node is found
      if (node) {
        node.val = val;
        return node;
      }
      // Node not found
      return false;
    }
Allright! So we get nodes, we update them we remove and add new nodes but only at the beginning and at the end, we want also to add an element at a certain index or remove it. So let's start with our insert method
/*
* Insert a new node in to the list
* @param {Number} index - the index for the node
* @param val - the node's value
* @returns {Node} the newly added node
*/

insert(index, val) {
  // We first test if the index is valid in the list
  if (index > this.length || index < 0) return false;
  // If the index is 0 then we are adding a new head
  // We can use the previous method unshift to do this
  if (index === 0) {
    return this.unshift(val);
  }
  // The index might also be the last item
  // Hence the tail. Again we can use one of the previous method
  // This time push as we add the node at the end of the array
  if (index === this.length) {
    this.push(val);
    return true;
  }
  // Create a new Node
  const node = new Node(val);


  // We find the node that precedes our new node
  let prev = this.get(index - 1);

  // We need to swap the values with our new node
  // let's use a tmp variable for it
  let tmp = prev.next;

  // Set next to be the new Node
  // Because index - 1 so we have to
  // add the node to the next
  prev.next = newNode;

  // set next from new inserted val
  // to be the temp we stored before
  newNode.next = temp;

  // We must increase the length
  this.length++;
  // Return true
  return true;
}
This also should not really be hard to undertand. Basically what we do is that we add the new node at the index and we move the value that was at that index after.
And now we can remove the node, this time we only need the index.
/*
* Removes a node from the list
* @param {Number} index - the index for the node
* @returns {Node} the node that was removed
*/

remove(index) {

  // Again let's check if the index is valid
  if (index < 0 || index > this.length) return false;

  // Or if index is the head or the tail
  if (index === 0) return this.shift();
  if (index === this.length - 1) {
    this.pop();
    return true;
  }

  // get the previous node
  let previousNode = this.get(index - 1);

  // The node after previousNode is our node
  // to be removed
  let removed = previousNode.next;

  // we set the previous node to be the next
  previousNode.next = removed.next;

  // decrease length
  this.length--;

  // return element
  return removed;
}
OK, so what is left now is to reverse the linked list. Reversing a linked list with Javascript seems also to be one of those hard interview questions. And, imo, the trickest part is just to understand what reversing a linked list really means.
The first time I approached it, without looking at any tutorial, I made the mistake of thinking to it as an array. For example in an array you have this:
[1,2,3,4,5]
And reversing it means to return this:
[5,4,3,2,1]
With linked list is different. To better understand what it means, let's look at it visually: You start with this:
1->2->3->4->5->null
And you have to return this:
null<-1<-2<-3<-4<-5
So basically that means:
- First we must swap head and tail, so our new head will be 5 and our tail will be 1
- Then we have to change the pointer,
node.next, to be the previous one. you just need to point to next link,
There are 2 ways to reverse a Linked List. We can do it using a loop, a for loop or while lopp, or we can do it with recursion.
Recursion is more elegant as solution, but it uses more memory because each time the function calls itself and it creates a new context.
I also, honestly, get easily confused with recursions. I will do with both, first using a loop then using recursion.
So the logic behind is:
- Swap head and tail
- Keep track of next node
- Keep track of previous node
- Set a node reference to the head
- Traverse the list using the node ref
- Set next to be node.next
- Set node.next to be the previous
- Set previous to be the actual node
- Move on the loop
/*
* Reverse the List
* @return {SinglyLinkedList} list
*/

reverse() {

	 /**
   	 * Reverse the Linked List
    * @return {SinglyLinkedList} - The reversed list
    * @Example
    Original List: 1 -> 2 -> 3 -> 4 -> 5
    Reversed List: 1 <- 2 <- 3 <- 4 <- 5
    */

	 // If List is empty return the List
    if (this.isEmpty()) return this;

    // swap head and tail
    // And keep a reference
    // For the tail because it will be our
    // New head
    let node = this.head;
    this.tail = node;
    // We need to variable to
    // keep reference to previous and next Node
    let prev, next;

    // Loop through the list
    // We could also use the run method
    while (node) {
      // we save the next value @example 2
      next = node.next;

      // set the next node the be the previous
      // @example 2 will be the previous of 1
      node.next = prev;

      // Set previous to be the actual Node
      // @example 1
      // @example Now 2 as 1 as next 1 <- 2
      prev = node;

      // Move on to the loop
      node = next;
    }
    // When the loop is finished
    // Our prev is our reversed list
    // So we just set it to be the head
    // @example (tail)1 <- 2 <- 3 <- 4 <- 5(head)
    this.head = prev;
    return this;
  }
One thing that I must specify here, we are reversing the Linked List in place, we are not returning a new list, it would be too easy. :D
Ok, so now it's time for recursion. The concept is always the same, but first we reverse the list using a recursive function, then finally we swap head and tail.
	reverseWithRecursion() {
    /**
     *
     * @param {Node} head
     * @return {Node} The reversed head of he list
     */

    function reverse(head) {
      if (!head || !head.next) {
        return head;
      }

      let tmp = reverse(head.next);
      head.next.next = head;
      head.next = null;
      return tmp;
    }
    reverse(this.head);

    // Swap head and tail
    let node = this.tail;
    this.tail = this.head;
    this.head = node;
    // Return list
    return this;
  }
This can be a little confusing, but the idea is basically the same, looping trough the list and swap the pointer next to point to the previous.
Recursion can be confusing, and to be honest I think, at least in this case, makes the code less readable compare with the classic while loop.
All the code for this tutorial can be found on github.